/ July 2016 ~ TI-UNPAM Angkatan18

Selamat Datang di Website Kelas TPLEI-Teknik Informatika UNPAM Angkatan XVIII

Universitas Pamulang

Pages

Friday, July 22, 2016

Set Time, Date Timezone in Linux from Command Line or Gnome | Use ntp

Written by
Date: 2012-04-19 15:55:00 00:00
To have the correct time and date in Linux is very important, a lot of things depends on it. It does not matter if you are using Linux to power your personal computer or you have a Linux server. The server and system clock needs to be on time.
Set date from the command line
date +%Y%m%d -s "20120418"
Set time from the command line
date +%T -s "11:14:00"
Set time and date from the command line
date -s "19 APR 2012 11:14:00"
Linux check date from command line
date
Will show you something like this:
Thu Apr 19 15:17:34 BOT 2012
Set hardware clock
The hardware clock is the clock that runs in you PC hardware even if you disconnect it from the main power supply. This is because it has a lithium battery in the modern computers and another type of battery in the old ones.
We'll see differences between hardware clock and system clock
hwclock --show
Will output something like this:
Thu 19 Apr 2012 03:23:05 PM BOT  -0.785086 seconds
Now check the system clock
date
Will output something like this:
Thu Apr 19 15:26:41 BOT 2012
Let's set the hardware clock to local time:
hwclock --set --date="2012-04-19 16:45:05" --localtime
If you want to set it to UTC time use:
hwclock --set --date="2011-04-19 20:45:05"  --utc
Set the timezone
To set the timezone of your system clock do the following:
cp /usr/share/zoneinfo/America/La_Paz /etc/localtime
Choose the right timezone for you.
Automatically adjust your computer clock
To have your system to automatically adjust time we need to install ntp. Get it from your repository. Once installed you can configure it this way:
Edit the file /etc/ntpd.conf. It will look like this:
# With the default settings below, ntpd will only synchronize your clock.
#
# For details, see:
# - the ntp.conf man page
# - http://support.ntp.org/bin/view/Support/GettingStarted
# - https://wiki.archlinux.org/index.php/Network_Time_Protocol_daemon

# Associate to public NTP pool servers; see http://www.pool.ntp.org/
server 0.pool.ntp.org
server 1.pool.ntp.org
server 2.pool.ntp.org

# Only allow read-only access from localhost
restrict default noquery nopeer
restrict 127.0.0.1
restrict ::1

# Location of drift and log files
driftfile /var/lib/ntp/ntp.drift
logfile /var/log/ntp.log

# NOTE: If you run dhcpcd and have lines like 'restrict' and 'fudge' appearing
# here, be sure to add '-Y -N' to the dhcpcd_ethX variables in /etc/conf.d/net
Be sure to start the daemon, and to make it start automatically when the system boots.
On Arch Linux is: /etc/rc.d/ntpd start on Debian and derivatives /etc/init.d/ntpd start
Update from the command line against a time server
You can update the clock manually, without the need of the daemon with ntpdate
ntpdate 129.6.15.28
You will get something like this:
19 Apr 15:45:23 ntpdate[10948]: step time server 129.6.15.28 offset -45.697084 sec
Bonus: Set the time and Date on Gnome
If you are using Gnome right click on the clock and select adjust, or go to: System > Administration > Time and Date (You may be asked for root password)
You will see a window similar to this one:


Source : https://www.garron.me/en/linux/set-time-date-timezone-ntp-linux-shell-gnome-command-line.html
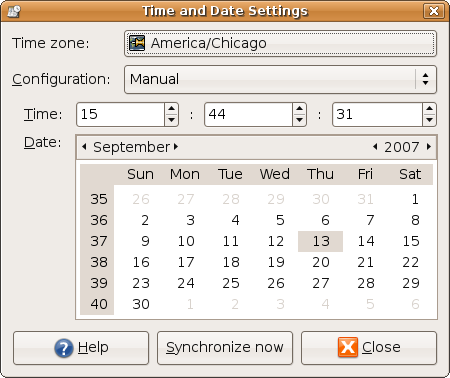
Ubuntu gnome time and date

Quick setup guide for HACMP/PowerHA


Use this procedure to quickly configure an HACMP cluster, consisting of 2 nodes and disk heartbeating. 

Prerequisites: 

Make sure you have the following in place:
  • Have the IP addresses and host names of both nodes, and for a service IP label. Add these into the /etc/hosts files on both nodes of the new HACMP cluster.
  • Make sure you have the HACMP software installed on both nodes. Just install all the filesets of the HACMP CD-ROM, and you should be good.
  • Make sure you have this entry in /etc/inittab (as one of the last entries):
    clinit:a:wait:/bin/touch /usr/es/sbin/cluster/.telinit
  • In case you're using EMC SAN storage, make sure you configure you're disks correctly as hdiskpower devices. Or, if you're using a mksysb image, you may want to follow this procedure EMC ODM cleanup.
Steps:
  • Create the cluster and its nodes:
    # smitty hacmp
    Initialization and Standard Configuration
    Configure an HACMP Cluster and Nodes
    Enter a cluster name and select the nodes you're going to use. It is vital here to have the hostnames and IP address correctly entered in the /etc/hosts file of both nodes.
  • Create an IP service label:
    # smitty hacmp
    Initialization and Standard Configuration
    Configure Resources to Make Highly Available
    Configure Service IP Labels/Addresses
    Add a Service IP Label/Address
    Enter an IP Label/Address (press F4 to select one), and enter a Network name (again, press F4 to select one).
  • Set up a resource group:
    # smitty hacmp
    Initialization and Standard Configuration
    Configure HACMP Resource Groups
    Add a Resource Group
    Enter the name of the resource group. It's a good habit to make sure that a resource group name ends with "rg", so you can recognize it as a resource group. Also, select the participating nodes. For the "Fallback Policy", it is a good idea to change it to "Never Fallback". This way, when the primary node in the cluster comes up, and the resource group is up-and-running on the secondary node, you won't see a failover occur from the secondary to the primary node.

    Note: The order of the nodes is determined by the order you select the nodes here. If you put in "node01 node02" here, then "node01" is the primary node. If you want to have this any other way, now is a good time to correctly enter the order of node priority.
  • Add the Servie IP/Label to the resource group:
    # smitty hacmp
    Initialization and Standard Configuration
    Configure HACMP Resource Groups
    Change/Show Resources for a Resource Group (standard)
    Select the resource group you've created earlier, and add the Service IP/Label.
  • Run a verification/synchronization:
    # smitty hacmp
    Extended Configuration
    Extended Verification and Synchronization
    Just hit [ENTER] here. Resolve any issues that may come up from this synchronization attempt. Repeat this process until the verification/synchronization process returns "Ok". It's a good idea here to select to "Automatically correct errors".
  • Start the HACMP cluster:
    # smitty hacmp
    System Management (C-SPOC)
    Manage HACMP Services
    Start Cluster Services
    Select both nodes to start. Make sure to also start the Cluster Information Daemon.
  • Check the status of the cluster:
    # clstat -o
    # cldump
    Wait until the cluster is stable and both nodes are up.
Basically, the cluster is now up-and-running. However, during the Verification & Synchronization step, it will complain about not having a non-IP network. The next part is for setting up a disk heartbeat network, that will allow the nodes of the HACMP cluster to exchange disk heartbeat packets over a SAN disk. We're assuming here, you're using EMC storage. The process on other types of SAN storage is more or less similar, except for some differences, e.g. SAN disks on EMC storage are called "hdiskpower" devices, and they're called "vpath" devices on IBM SAN storage.

First, look at the available SAN disk devices on your nodes, and select a small disk, that won't be used to store any data on, but only for the purpose of doing the disk heartbeat. It is a good habit, to request your SAN storage admin to zone a small LUN as a disk heartbeating device to both nodes of the HACMP cluster. Make a note of the PVID of this disk device, for example, if you choose to use device hdiskpower4:
# lspv | grep hdiskpower4
hdiskpower4   000a807f6b9cc8e5    None
So, we're going to set up the disk heartbeat network on device hdiskpower4, with PVID 000a807f6b9cc8e5:
  • Create an concurrent volume group:
    # smitty hacmp
    System Management (C-SPOC)
    HACMP Concurrent Logical Volume Management
    Concurrent Volume Groups
    Create a Concurrent Volume Group
    Select both nodes to create the concurrent volume group on by pressing F7 for each node. Then select the correct PVID. Give the new volume group a name, for example "hbvg".
  • Set up the disk heartbeat network:
    # smitty hacmp
    Extended Configuration
    Extended Topology Configuration
    Configure HACMP Networks
    Add a Network to the HACMP Cluster
    Select "diskhb" and accept the default Network Name.
  • Run a discovery:
    # smitty hacmp
    Extended Configuration
    Discover HACMP-related Information from Configured Nodes
  • Add the disk device:
    # smitty hacmp
    Extended Configuration
    Extended Topology Configuration
    Configure HACMP Communication Interfaces/Devices
    Add Communication Interfaces/Devices
    Add Discovered Communication Interface and Devices
    Communication Devices
    Select the disk device on both nodes by selecting the same disk on each node by pressing F7.
  • Run a Verification & Synchronization again, as described earlier above. Then check with clstat and/or cldump again, to check if the disk heartbeat network comes online.
source : http://www.torontoaix.com/hacmp-powerha-how-to-faqs/quick_setup_hacmp 

How to install the Apache mod_ssl module

mod_ssl

mod_ssl is an Apache module that provides SSL v2/v3 and TLS v1 support for the Apache HTTP Server.  See the mod_ssl documentation (link is external) for more information.

How to install the Apache mod_ssl module

  1. Run the mod_ssl install command
    yum install mod_ssl

How to configure the Apache mod_ssl module

  1. Open the mod_ssl Apache configuration file located at /etc/httpd/conf.d/ssl.conf
  2. Enable name-based virtual hosting on port 443
    1. Add the following text just before the SSL Virtual Host Context comment
      # Use name-base virtual hosting
      NameVirtualHost *:443
  3. Disable the default https host
    1. Comment out all text following the SSL Virtual Host Context comment
  4. Restart the Apache HTTP Server
    service httpd restart