/ 2016 ~ TI-UNPAM Angkatan18

Selamat Datang di Website Kelas TPLEI-Teknik Informatika UNPAM Angkatan XVIII

Universitas Pamulang

Pages

Friday, November 25, 2016

How to Install SQL Server 2008 R2 (Express Edition)

Overview:
With the release of the SQL Server 2008 R2 November, we have simplified the SQL Server Express (all editions and package) installation process.  In this release, we have completed the following:
  1. Reduced the number of clicks by 50% when performing an install.
  2. All inputs are defaulted on Vista and above operating systems.  (many inputs are defaults on Windows XP and Windows 2003, except for the service accounts)
  3. Skip (auto advance) through the UI, meaning non-essential dialogs will still be skipped.
  4. Reduced the size of the Express basic package

Available Express editions for download:
Express Package
If your system is?
If your system is?
If your system is?
Microsoft® SQL Server® 2008 R2 Express
Microsoft® SQL Server® 2008 R2 Express with Tools
.
Microsoft® SQL Server® 2008 R2 Express with Advanced Services
.
Microsoft® SQL Server® 2008 R2 Management Studio Express
.

Below I show the steps to install SQL Server 2008 R2 Express.
1. Launch the package, you will then see the contents extracted to a temporary location.
image

2. SQL Server Setup checks to determine pre-reqs are installed. If not, you will be prompted to install.
 image
3. The Installation Center will then launch. Click on “New installation or add feature to an existing installation” to start the Installation Wizard.
image

4. Accept the license terms.
image

5. Review the features to installed and where SQL Server will be installed. Make any changes that are necessary for your environment.
image

6. Review the Instance Name and change if necessary.
image
 
7. Review the credentials that will be used for the services that will be created. 
image

8. Review the Authentication Mode and the administrators that will be added to the Database Engine.
image

9. Review the Error Reporting settings. We encourage you to keep this option checked, as we review the product feedback on an ongoing basic.  This helps us to continually improve SQL Server.
image

10. That’s it!


image 
Sumber : https://blogs.msdn.microsoft.com/petersad/2009/11/12/how-to-install-sql-server-2008-r2-express-edition/

Wednesday, August 31, 2016

BERITA DUKA ("Inna lillahi wa inna ilaihi raji'un")


"Inna lillahi wa inna ilaihi raji'un"
Telah meninggal dunia Teman/Saudara/Adik Kami yang bernama :

MARZUKI (NIM: 2015140237) Kelas : 03TPLEI 

Pada Tgl.26 Agustus 2016 di Bandung, Jam: 09:00 dan telah dikebumikan tempat kelahirannya Kota Lampung.

Mohon Do'a dari Rekan-rekan dan staff TI Unpam semoga Almarhum diberikan tempat yang layak disisi Allah dan diampuni segala dosa-dosa-Nya....Aamiin YRA.

Tuesday, August 23, 2016

Cannot Retrieve Metalink for Repository: EPEL

Cannot Retrieve Metalink for Repository: EPEL

»»»Cannot Retrieve Metalink for Repository: EPEL
When using yum to install or update software packages through “yum install” or “yum update” commands, the following stop error occurred:
Loaded plugins: fastestmirror, security
Loading mirror speeds from cached hostfile
Error: Cannot retrieve metalink for repository: epel. Please verify its path and try again
The error is related to inability to connect to external services via HTTPS (443) connection (EPEL repo uses HTTPS connection by default). There are many reasons that can cause this error, thus to resolve the issue, troubleshooting and understanding the underlying issue is important. Here’s several possible solutions for the error above.
One possible possibility is that the CA certificates installed on the system has became outdated, and hence cannot connect directly due to unverifiable certificate errors when getting the updated metalink file for EPEL via HTTPS. In this scenario, update the CA certificates package with the following command:
yum --disablerepo=epel -y update  ca-certificates
Note that you may also need to disable all repos that uses HTTPS protocol and are failing.
If the CA certifications are already latest with no update available, or if you absolutely cannot get through the cannot retrieve the repo path error, it’s possible to force the repository to use HTTP instead of HTTPS. However, do note that this may also indicate that your system is having other problems which you need to find out.
To do so, edit the repository configuration file in /etc/yum.repos.d/, e.g. vi /etc/yum.repos.d/epel.repo, and then comment out the entries that are starting with mirrorlist=, and then uncomment the entries that are starting with baseurl=. For example,
[epel]
name=Extra Packages for Enterprise Linux 6 - $basearch
baseurl=http://download.fedoraproject.org/pub/epel/6/$basearch
#mirrorlist=https://mirrors.fedoraproject.org/metalink?repo=epel-6&arch=$basearch
failovermethod=priority
enabled=1
gpgcheck=1
gpgkey=file:///etc/pki/rpm-gpg/RPM-GPG-KEY-EPEL-6
Tip
You only need to change for the repos that are enabled, i.e. have enabled=1.
An alternative is to change the URL for the mirrorlist to HTTP, from HTTPS. You can do so easily with the following command:
sudo sed -i "s/mirrorlist=https/mirrorlist=http/" /etc/yum.repos.d/epel.repo
Or, edit manually /etc/yum.repos.d/epel.repo, the change the line from:
mirrorlist=https://mirrors.fedoraproject.org/metalink?repo=epel-6&arch=$basearch
To:
mirrorlist=http://mirrors.fedoraproject.org/metalink?repo=epel-6&arch=$basearch
It’s also possible to disable the SSL certificate check by adding following line into appreciate EPEL section of /etc/yum.repos.d/epel.repo:
sslverify=false
For example,
[epel]
name=Extra Packages for Enterprise Linux 6 - $basearch
baseurl=http://download.fedoraproject.org/pub/epel/6/$basearch
#mirrorlist=https://mirrors.fedoraproject.org/metalink?repo=epel-6&arch=$basearch
failovermethod=priority
enabled=1
gpgcheck=1
gpgkey=file:///etc/pki/rpm-gpg/RPM-GPG-KEY-EPEL-6
sslverify=false
Last but not least, as mentioned above, normally the HTTPS secure connection to retrieve repositories’ databases should work. It it doesn’t, it may hint at a larger problem. The error can also be caused by broken or corrupted packages, or failing yum and rpm functions, such as in the case of mismatched nss-softokn versions. Thus, if issue persisted after updating CA certificates, do check around for possible other issues.

Friday, July 22, 2016

Set Time, Date Timezone in Linux from Command Line or Gnome | Use ntp

Written by
Date: 2012-04-19 15:55:00 00:00
To have the correct time and date in Linux is very important, a lot of things depends on it. It does not matter if you are using Linux to power your personal computer or you have a Linux server. The server and system clock needs to be on time.
Set date from the command line
date +%Y%m%d -s "20120418"
Set time from the command line
date +%T -s "11:14:00"
Set time and date from the command line
date -s "19 APR 2012 11:14:00"
Linux check date from command line
date
Will show you something like this:
Thu Apr 19 15:17:34 BOT 2012
Set hardware clock
The hardware clock is the clock that runs in you PC hardware even if you disconnect it from the main power supply. This is because it has a lithium battery in the modern computers and another type of battery in the old ones.
We'll see differences between hardware clock and system clock
hwclock --show
Will output something like this:
Thu 19 Apr 2012 03:23:05 PM BOT  -0.785086 seconds
Now check the system clock
date
Will output something like this:
Thu Apr 19 15:26:41 BOT 2012
Let's set the hardware clock to local time:
hwclock --set --date="2012-04-19 16:45:05" --localtime
If you want to set it to UTC time use:
hwclock --set --date="2011-04-19 20:45:05"  --utc
Set the timezone
To set the timezone of your system clock do the following:
cp /usr/share/zoneinfo/America/La_Paz /etc/localtime
Choose the right timezone for you.
Automatically adjust your computer clock
To have your system to automatically adjust time we need to install ntp. Get it from your repository. Once installed you can configure it this way:
Edit the file /etc/ntpd.conf. It will look like this:
# With the default settings below, ntpd will only synchronize your clock.
#
# For details, see:
# - the ntp.conf man page
# - http://support.ntp.org/bin/view/Support/GettingStarted
# - https://wiki.archlinux.org/index.php/Network_Time_Protocol_daemon

# Associate to public NTP pool servers; see http://www.pool.ntp.org/
server 0.pool.ntp.org
server 1.pool.ntp.org
server 2.pool.ntp.org

# Only allow read-only access from localhost
restrict default noquery nopeer
restrict 127.0.0.1
restrict ::1

# Location of drift and log files
driftfile /var/lib/ntp/ntp.drift
logfile /var/log/ntp.log

# NOTE: If you run dhcpcd and have lines like 'restrict' and 'fudge' appearing
# here, be sure to add '-Y -N' to the dhcpcd_ethX variables in /etc/conf.d/net
Be sure to start the daemon, and to make it start automatically when the system boots.
On Arch Linux is: /etc/rc.d/ntpd start on Debian and derivatives /etc/init.d/ntpd start
Update from the command line against a time server
You can update the clock manually, without the need of the daemon with ntpdate
ntpdate 129.6.15.28
You will get something like this:
19 Apr 15:45:23 ntpdate[10948]: step time server 129.6.15.28 offset -45.697084 sec
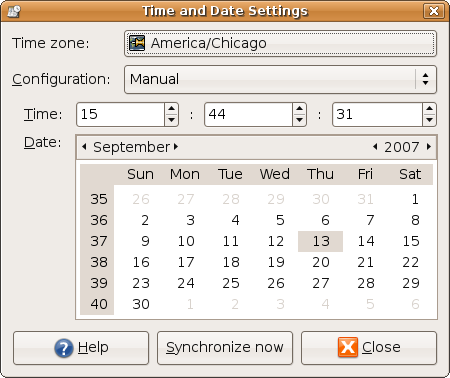
Bonus: Set the time and Date on Gnome
If you are using Gnome right click on the clock and select adjust, or go to: System > Administration > Time and Date (You may be asked for root password)
You will see a window similar to this one:


Source : https://www.garron.me/en/linux/set-time-date-timezone-ntp-linux-shell-gnome-command-line.html

Ubuntu gnome time and date

Quick setup guide for HACMP/PowerHA


Use this procedure to quickly configure an HACMP cluster, consisting of 2 nodes and disk heartbeating. 

Prerequisites: 

Make sure you have the following in place:
  • Have the IP addresses and host names of both nodes, and for a service IP label. Add these into the /etc/hosts files on both nodes of the new HACMP cluster.
  • Make sure you have the HACMP software installed on both nodes. Just install all the filesets of the HACMP CD-ROM, and you should be good.
  • Make sure you have this entry in /etc/inittab (as one of the last entries):
    clinit:a:wait:/bin/touch /usr/es/sbin/cluster/.telinit
  • In case you're using EMC SAN storage, make sure you configure you're disks correctly as hdiskpower devices. Or, if you're using a mksysb image, you may want to follow this procedure EMC ODM cleanup.
Steps:
  • Create the cluster and its nodes:
    # smitty hacmp
    Initialization and Standard Configuration
    Configure an HACMP Cluster and Nodes
    Enter a cluster name and select the nodes you're going to use. It is vital here to have the hostnames and IP address correctly entered in the /etc/hosts file of both nodes.
  • Create an IP service label:
    # smitty hacmp
    Initialization and Standard Configuration
    Configure Resources to Make Highly Available
    Configure Service IP Labels/Addresses
    Add a Service IP Label/Address
    Enter an IP Label/Address (press F4 to select one), and enter a Network name (again, press F4 to select one).
  • Set up a resource group:
    # smitty hacmp
    Initialization and Standard Configuration
    Configure HACMP Resource Groups
    Add a Resource Group
    Enter the name of the resource group. It's a good habit to make sure that a resource group name ends with "rg", so you can recognize it as a resource group. Also, select the participating nodes. For the "Fallback Policy", it is a good idea to change it to "Never Fallback". This way, when the primary node in the cluster comes up, and the resource group is up-and-running on the secondary node, you won't see a failover occur from the secondary to the primary node.

    Note: The order of the nodes is determined by the order you select the nodes here. If you put in "node01 node02" here, then "node01" is the primary node. If you want to have this any other way, now is a good time to correctly enter the order of node priority.
  • Add the Servie IP/Label to the resource group:
    # smitty hacmp
    Initialization and Standard Configuration
    Configure HACMP Resource Groups
    Change/Show Resources for a Resource Group (standard)
    Select the resource group you've created earlier, and add the Service IP/Label.
  • Run a verification/synchronization:
    # smitty hacmp
    Extended Configuration
    Extended Verification and Synchronization
    Just hit [ENTER] here. Resolve any issues that may come up from this synchronization attempt. Repeat this process until the verification/synchronization process returns "Ok". It's a good idea here to select to "Automatically correct errors".
  • Start the HACMP cluster:
    # smitty hacmp
    System Management (C-SPOC)
    Manage HACMP Services
    Start Cluster Services
    Select both nodes to start. Make sure to also start the Cluster Information Daemon.
  • Check the status of the cluster:
    # clstat -o
    # cldump
    Wait until the cluster is stable and both nodes are up.
Basically, the cluster is now up-and-running. However, during the Verification & Synchronization step, it will complain about not having a non-IP network. The next part is for setting up a disk heartbeat network, that will allow the nodes of the HACMP cluster to exchange disk heartbeat packets over a SAN disk. We're assuming here, you're using EMC storage. The process on other types of SAN storage is more or less similar, except for some differences, e.g. SAN disks on EMC storage are called "hdiskpower" devices, and they're called "vpath" devices on IBM SAN storage.

First, look at the available SAN disk devices on your nodes, and select a small disk, that won't be used to store any data on, but only for the purpose of doing the disk heartbeat. It is a good habit, to request your SAN storage admin to zone a small LUN as a disk heartbeating device to both nodes of the HACMP cluster. Make a note of the PVID of this disk device, for example, if you choose to use device hdiskpower4:
# lspv | grep hdiskpower4
hdiskpower4   000a807f6b9cc8e5    None
So, we're going to set up the disk heartbeat network on device hdiskpower4, with PVID 000a807f6b9cc8e5:
  • Create an concurrent volume group:
    # smitty hacmp
    System Management (C-SPOC)
    HACMP Concurrent Logical Volume Management
    Concurrent Volume Groups
    Create a Concurrent Volume Group
    Select both nodes to create the concurrent volume group on by pressing F7 for each node. Then select the correct PVID. Give the new volume group a name, for example "hbvg".
  • Set up the disk heartbeat network:
    # smitty hacmp
    Extended Configuration
    Extended Topology Configuration
    Configure HACMP Networks
    Add a Network to the HACMP Cluster
    Select "diskhb" and accept the default Network Name.
  • Run a discovery:
    # smitty hacmp
    Extended Configuration
    Discover HACMP-related Information from Configured Nodes
  • Add the disk device:
    # smitty hacmp
    Extended Configuration
    Extended Topology Configuration
    Configure HACMP Communication Interfaces/Devices
    Add Communication Interfaces/Devices
    Add Discovered Communication Interface and Devices
    Communication Devices
    Select the disk device on both nodes by selecting the same disk on each node by pressing F7.
  • Run a Verification & Synchronization again, as described earlier above. Then check with clstat and/or cldump again, to check if the disk heartbeat network comes online.
source : http://www.torontoaix.com/hacmp-powerha-how-to-faqs/quick_setup_hacmp 

How to install the Apache mod_ssl module

mod_ssl

mod_ssl is an Apache module that provides SSL v2/v3 and TLS v1 support for the Apache HTTP Server.  See the mod_ssl documentation (link is external) for more information.

How to install the Apache mod_ssl module

  1. Run the mod_ssl install command
    yum install mod_ssl

How to configure the Apache mod_ssl module

  1. Open the mod_ssl Apache configuration file located at /etc/httpd/conf.d/ssl.conf
  2. Enable name-based virtual hosting on port 443
    1. Add the following text just before the SSL Virtual Host Context comment
      # Use name-base virtual hosting
      NameVirtualHost *:443
  3. Disable the default https host
    1. Comment out all text following the SSL Virtual Host Context comment
  4. Restart the Apache HTTP Server
    service httpd restart

Saturday, June 18, 2016

How To Set Up and Use Yum Repositories on a CentOS 6 VPS

Introduction

YUM Repositories are warehouses of Linux software (RPM package files). RPM package file is a Red Hat Package Manager file and enables quick and easy software installation on Red Hat/CentOS Linux. YUM Repositories hold a number of RPM package files and enable download and installation of new software on our VPS. YUM Repositories can hold RPM package files locally (local disk) or remotely (FTP, HTTP or HTTPS). YUM Configuration files hold the information required to successfully find and install software (RPM packages files) on our VPS.
Most common and largest CentOS YUM Repositories:
Advantages of installing software from YUM Repositories are:
  • Easy Software Management - installing, updating, and deleting packages is simple
  • Software Dependency Resolution - software dependencies are automatically resolved and installed
  • Official Red Hat/CentOS Package Manager - YUM is official Red Hat/CentOS package manager
Sometimes the software we want to install on our CentOS VPS is not available from default Official CentOS Repositories. In situations like this, we can use one of the additional (Non-Official) CentOS YUM Repositories listed above. Additional repositories sometimes hold newer versions of software packages than Official CentOS Repositories.

YUM Repository Configuration File

We can install new software on Red Hat/CentOS Linux with "yum install packagename" command from console. Running this command first checks for existing YUM Repository configuration files in /etc/yum.repos.d/ directory. It reads each YUM Repository configuration file to get the information required to download and install new software, resolves software dependencies and installs the required RPM package files.
YUM Repository configuration files must:
  • be located in /etc/yum.repos.d/ directory
  • have .repo extension, to be recognized by YUM
Available YUM Repository configuration file options are:
  • Repository ID - One word unique repository ID (example: [examplerepo])
  • Name - Human readable name of the repository (example: name=Example Repository)
  • Baseurl - URL to the repodata directory. You can use file://path if repository is located locally or ftp://link, http://link, https://link if repository is located remotely - HTTP Authentication available http://user:password@www.repo1.com/repo1 (example: baseurl=http://mirror.cisp.com/CentOS/6/os/i386/)
  • Enabled - Enable repository when performing updates and installs (example: enabled=1)
  • Gpgcheck - Enable/disable GPG signature checking (example: gpgcheck=1)
  • Gpgkey - URL to the GPG key (example: gpgkey=http://mirror.cisp.com/CentOS/6/os/i386/RPM-GPG-KEY-CentOS-6)
  • Exclude - List of the packages to exclude (example: exclude=httpd,mod_ssl)
  • Includepkgs - List of the packages to include (example: include=kernel)
Required YUM Repository configuration file options are:
  • Repository ID
  • Name
  • Baseurl
  • Enabled

Step 1: Create YUM Repository configuration file

Use your favorite console text editor and create a new YUM Repository configuration file with .repo extension in /etc/yum.repos.d/ directory. To create a new file with "vi editor" run the following command from console:
vi /etc/yum.repos.d/example.repo

Step 2: Insert YUM Repository options

Insert the desired YUM Repository options to the newly created YUM Repository configuration file and save changes.

Example YUM Repository Configuration file:

/etc/yum.repos.d/example.repo

CentOS DVD ISO YUM Repository

CentOS DVD ISO holds a large number of software (RPM package files) which are available for installation during Red Hat/CentOS installation wizard. We can also use RPM package files from CentOS DVD ISO to create CentOS DVD ISO YUM Repository. This way we can install all of the software available on CentOS DVD ISO with "yum install packagename" command from VPS console even after we have completed Red Hat/CentOS installation wizard.

Step 1: Download/Transfer CentOS DVD ISO

CentOS DVD ISO files are available for download at http://mirror.centos.org/. We need to download or transfer CentOS DVD ISO to our VPS:
  • Transfer - If we have already downloaded CentOS DVD ISO to a machine different than our VPS, we will need to transfer it from our machine to our cloud server via FTP or SSH. We can do this with software like WinSCP (free SFTP client and FTP) or similar.
  • Download - We can download CentOS DVD ISO directly to our VPS with "wget" command from console (please change HTTP link accordingly):

Step 2: Mount CentOS DVD ISO

To view the CentOS DVD ISO data, we first need to mount it on desired location. We usually mount CD-ROM, USB devices or ISO files to /mnt directory (if free to use). To mount CentOS DVD ISO run the following command from console (please change /path/to/iso and /mnt accordingly):
mount -o loop /path/to/iso /mnt

Step 3: Create YUM Repository Configuration file

To start using the newly created Custom YUM Repository we must create YUM Repository Configuration file with .repo extension, which must be placed to /etc/yum.repos.d/ directory. Instructions to create YUM Repository Configuration file are covered in the first topic of this article called "YUM Repository Configuration File".

Example CentOS DVD ISO YUM Repository Configuration file:

/etc/yum.repos.d/centosdvdiso.repo
[centosdvdiso]
name=CentOS DVD ISO
baseurl=file:///mnt
enabled=1
gpgcheck=1
gpgkey=file:///mnt/RPM-GPG-KEY-CentOS-6

Custom YUM Repository

Sometimes we need to create a Custom YUM Repository (handy when the VPS has no internet connection). We can create a Custom YUM Repository from a desired number of selected RPM package files. Custom YUM Repository only holds the RPM package files we want to include in.

Step 1: Install "createrepo"

To create Custom YUM Repository we need to install additional software called "createrepo" on our cloud server. We can install "createrepo" by running the following command from console:
yum install createrepo

Step 2: Create Repository directory

We need to create a new directory that will be the location of our Custom YUM Repository and will hold the desired RPM package files. We can do this with the following command from console (choose a different /repository1 directory name if you like):
mkdir /repository1

Step 3: Put RPM files to Repository directory

If RPM package files are not yet present on our VPS we need to transfer them to our cloud server via FTP or SSH - use software like WinSCP (free SFTP client and FTP) or similar. We can also download RPM package files directly to our VPS (internet connection needed) with "wget" command from console (please change HTTP link accordingly):
If RPM files are already present on our VPS, we need to Copy or Move these files to the newly created directory from "Step 2". We can move RPM files with the following command from console (please change /path/to/rpm and /repository1 accordingly):
mv /path/to/rpm /repository1
We can copy RPM files with the following command from console (please change /path/to/rpm and /repository1 accordingly):
cp /path/to/rpm /repository1

Step 4: Run "createrepo"

Createrepo command reads through Custom YUM Repository directory from "Step 2" and creates a new directory called "repodata" in it. Repodata directory holds the metadata information for the newly created repository. Every time we add additional RPM package files to our Custom YUM Repository, we need to re-create Repository metadata with "createrepo" command. We can create new repository metadata by running the following command from console (please change /repository1 accordingly):
createrepo /repository1

Step 5: Create YUM Repository Configuration file

To start using the newly created Custom YUM Repository, we must create the corresponding YUM Repository Configuration file with .repo extension, which must be placed to /etc/yum.repos.d/ directory. Instructions to create YUM Repository Configuration file are covered in the first topic of this article called "YUM Repository Configuration File".

Example Custom YUM Repository Configuration file:

/etc/yum.repos.d/custom.repo
[customrepo]
name=Custom Repository
baseurl=file:///repository1/
enabled=1
gpgcheck=0
 
Source: https://www.digitalocean.com/community/tutorials/how-to-set-up-and-use-yum-repositories-on-a-centos-6-vps 

Wednesday, June 15, 2016

Installing CentOS 6.5 in VirtualBox

I have just installed CentOS 6.5 (minimal)  in Virtual Box on my Windows 8.1 pc. This is how I installed CentOS. Hope this helps.
[Update: The updated version of this article with screenshots for CentOS 6.7 can be found here.]
Requirements:
  1. CentOS 6.5 32-bit ISO : Download Link (~330 MB)
  2. Virtual Box : Download Link (~110 MB)
  3. Atleast 8 GB of free disk space.
Installation Procedure:
First, thing you need to  do is to set up your Virtual Box. Go ahead download and install Virtual Box (the download link is given above in the requirements).
Press “New“, Type Name as “CentOS 6.5 32 bit” or anything you want. Set the type as “Linux“, Version as “Red Hat 32 bit“. And press “Next”.
create vm
name and type of OS pic
Allocate RAM to 512 MB RAM or higher , then click “Next“.
select ram size pic
Then select the option “Create a virtual hard drive now “, then click on “Create“.
create hd pic
Select hard drive file type as the first option “VDI” , then click on “Next“.
hard disk type: vdi pic
Select type as “Dynamically allocated“. Choose the amount of hard disk space you want to allocate for your CentOS system. Select atleast 8Gb-10GB or higher and then click on “Create“.
VM HD size pic
Now, you would see the home screen of the Oracle Virtual box, Click on the CentOS VM you have created and then click “Start“.
start vm
Then click on the yellow folder icon and select the ISO file that you have downloaded.
Select ISO location
Then click on “Start“.
start boot
Wait for a few seconds and you will see the CentOS boot menu. Now, select the first option “Install or upgrade an existing system“.
Boot menu picture

[Note: To scroll through different options, you can either use the Arrow keys in your keyboard or the TAB key to move through different options . You may also use SPACE bar in your keyboard or ENTER key to make selections]
Now, you will probably get a message box saying “Disk Found” and if you want to verify the contents in the CD. Press “Skip”. If you need, you can press “OK” and verify the contents but it might take a while.
Using your arrow keys, select “Skip” and then hit “Enter“.
Disk check pic
loading screen
Hit “OK“.
CentOS Welcome
Now, select the language and then use the TAB key and then select “Ok” and hit ENTER.
select language
Now, select the model of the keyboardand then select “OK“.
keyboard selection pic
If you get a “Warning Message” such as the one below, just chooseRe-initialize all“.
Re-initialize all picture
Now, select your time zone and then hit “OK“. Then select a password for your “root” (or admin account), you can use TAB keys to reach the next box, and finally select “OK” and hit ENTER.
create root password
Now, select the option “Use entire drive“, and select “OK”.
allocate hard drive picture
Now, select “Write changes to disk” and the installer should start right up.
installation picture
installation progress pic
After, it is done installing , you will see a message saying “Congratulations, your CentOS installation is complete“. Select “Reboot” and hit ENTER.
installation complete -Reboot
Now, it should boot right up.
centos bootup picture
now, type login as: root , Then hit ENTER. Then type the password and hit ENTER. You should see now be able to see the terminal window with the # symbol.
root login pic

And voilĂ  ! You have successfully installed CentOS 6.5 in Virtual Box.
This is a minimal mode CentOS and so many application packages are not installed. You will also have to configure the network to access the internet.
[UPDATE: To configure network in CentOS 6.5 (which is the same as configuring centos 6.3), I have made a detailed guide with screenshots, you can find it here.]
If you have any sort of queries on regarding this installation, just leave a comment and will get back at you. Don’t forget to follow my blog to get future updates!

source: https://extr3metech.wordpress.com/2014/09/04/installing-centos-6-5-in-virtualbox-minimal-screenshots/

Installing Virtual Box in Windows 7

Step 1: Installing Virtual Box in Windows 7


beagle4.jpg
Steps to install Virtual Box in Windows 7:

1) Go https://www.virtualbox.org/wiki/Downloads
2) Download Virtual Box (latest version) for Windows hosts x86/amd64
3) "Save As"
4) When done downloading, run the .exe
5) "Run" if Windows pops up a security warning
6) Continue with the installation of VirtualBox with the defaults

This will open VirtualBox at the end of the installation.  Please proceed to step 2.